Restoring an old photograph means solving two problems at the same time: reducing visible damage and keeping the people recognizable. The second problem sets the limit. A cleaner face is not a successful restoration if the eyes, expression, age, or face shape no longer match the source.
The safest workflow treats the original scan as evidence and the AI result as a reversible working copy. Use automation for the repair it can show you, then make the final decision by comparing the source and result feature by feature.
The short answer
To restore an old photo without losing the face you remember:
- Digitize the complete photograph without damaging the print.
- Save an untouched master file before editing.
- Use the clearest, least-compressed copy as the AI input.
- Ask for repair while preserving identity, expression, and original tone.
- Compare the eyes, mouth, face shape, hairline, and age markers at 100% view.
- Reject a result that looks polished but no longer looks like the person.
No AI restoration tool can guarantee historically accurate missing detail. The goal is a more usable copy whose changes remain visible and reviewable.
- Untouched master
- Working copy
- AI result
- 100% review
Start with the original, not the AI tool
The quality of the digital copy sets the limit for everything that follows. A clear scan preserves more real evidence than a screenshot, a compressed messaging-app copy, or a phone photo taken at an angle.
The U.S. National Archives recommends digitizing family papers and photographs so they can be viewed and shared without repeatedly handling the originals. It also says to keep the originals after digitization because digital files have their own preservation risks. [1]
Use a scanner when the print is flat and safe to handle. If a phone is the only practical option, place the photograph on a flat surface, keep the camera parallel to it, use even light, and avoid reflections, shadows, fingers, and a visible tabletop.
Save the best capture as an untouched master. Give it a clear filename and back it up before creating an editing copy. The master remains the reference when an AI result looks convincing but uncertain.
| Starting file | Use it when | Watch for |
|---|---|---|
| Flatbed scan | The print is flat and safe to place on the scanner | A lid pressing on fragile or raised material |
| Phone photograph | The print cannot be scanned safely or a scanner is unavailable | Glare, shadows, perspective distortion, and cropped edges |
| Shared or downloaded copy | It is the only copy currently available | Messaging compression, screenshots, and lost fine detail |
Why AI restoration can change a face
Old photographs contain several kinds of damage at once. Some defects are structured, such as scratches and folds. Others are less predictable, such as fading, grain, blur, and missing texture. Research systems often treat global repair and facial refinement as separate problems. [2]
Face restoration relies on learned facial patterns when the input is unclear. That can produce a realistic face without proving that every reconstructed detail belongs to the original person. The official GFPGAN project describes this as a balance between realness and fidelity; its model notes acknowledge that one version can introduce a slight identity change. [3–4]
Realism and faithfulness therefore need separate checks. Smoother skin, sharper eyes, or a more symmetrical smile may look impressive while making the person less recognizable to someone who knew them.
What AI photo restoration can and cannot restore
The location of the damage matters as much as its size. A thin scratch across a blank wall is a lower-risk repair than the same scratch across an eye or handwritten name.
| Source condition | AI may help with | What remains uncertain |
|---|---|---|
| Dust, spots, and fine scratches | Reducing small marks when nearby texture is still visible | The exact texture hidden behind a mark |
| Fading and weak contrast | Making subjects and surroundings easier to see | The historically correct brightness and tone |
| Soft or grainy facial detail | Creating a clearer, more readable portrait | Exact eye shape, teeth, hair strands, and age detail |
| Tears and missing edges | Extending simple patterns near a small damaged area | Lost faces, writing, clothing, or meaningful objects |
How to restore old photos step by step
1. Create the cleanest digital copy you can
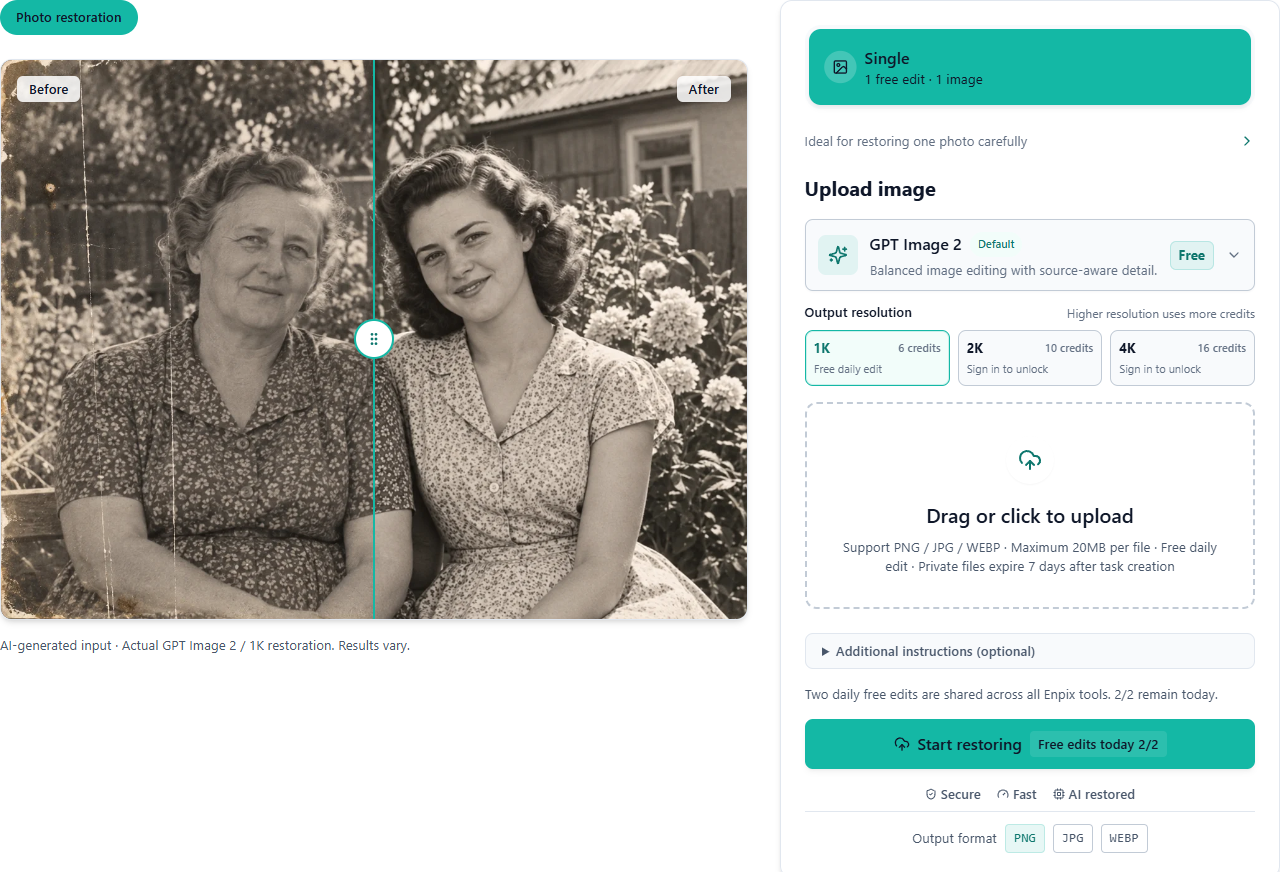
Capture the entire photograph, including its worn edges. Avoid aggressive cropping at the start because borders, handwriting, clothing, and background objects may help establish context. For Enpix, upload one original-resolution JPG, PNG, or WebP image up to 20 MB.
2. Keep restoration separate from colorization
Repairing scratches, restoring contrast, and adding color are different decisions. If the photograph is black and white or sepia, ask the model to preserve that tone. A separate colorized copy can be created later without replacing the monochrome record.
Example instruction: Reduce scratches and fading. Preserve both faces, expressions, age lines, hairstyles, clothing, and the original black-and-white tone. Do not add new objects.
3. Process a duplicate
Run restoration on a copy, never on the only digital master. Choose the model and resolution shown on the Enpix page, submit the task, and judge the result in the comparison view rather than on its own.
4. Inspect the face at 100%
Check the features that carry identity before looking at general polish. Then inspect clothing, hands, handwriting, architectural lines, and small background objects for confident but unsupported reconstruction.
5. Decide whether it is a restoration or a reinterpretation
Reject the result when an eye changes direction, a smile appears or disappears, the jaw becomes narrower, age is removed, or a missing facial area is completed without enough evidence.
6. Save the source and result together
Download the restored version and keep it beside the master scan with distinct filenames. Enpix makes submitted originals and results available for seven days from task creation, so it should not be treated as a permanent archive.
A face-preservation checklist
Compare the source and result at 100% view. Check these details before accepting the edit:
- distance and angle between the eyes
- eyebrow shape and height
- mouth width, lip shape, and expression
- jaw, cheeks, chin, and overall face shape
- hairline, part, curls, and visible ears
- age lines, freckles, scars, glasses, jewelry, and facial hair
A useful restoration reduces distracting damage while keeping the people and scene recognizable. If the face changes, return to the untouched copy and try a more conservative instruction or another available model. When every result changes identity, stop and consider manual restoration.
A transparent Enpix restoration example
The example uses an AI-generated old-family-photo scene as the damaged input. It is not a real family record. The restored image is an actual Enpix GPT Image 2 / 1K result, not a manually prepared after image.
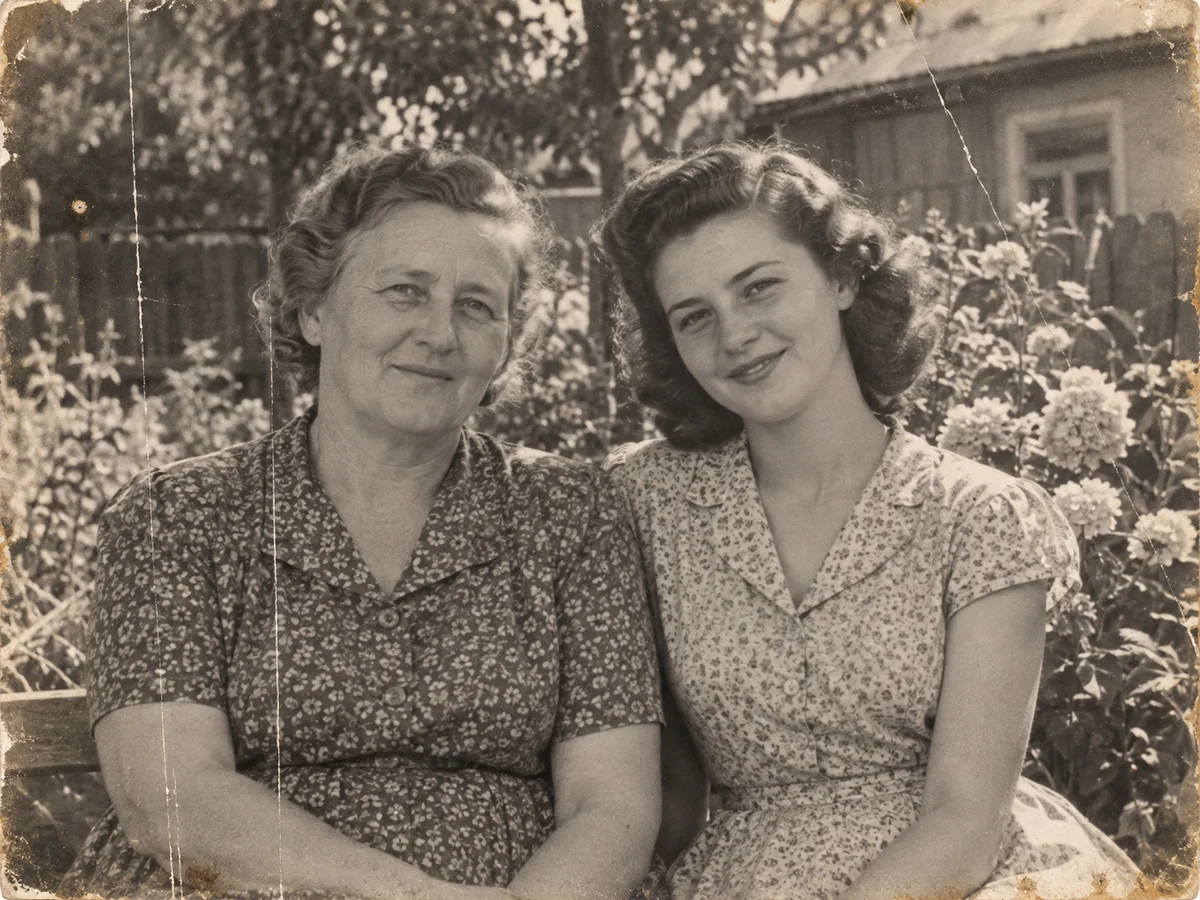
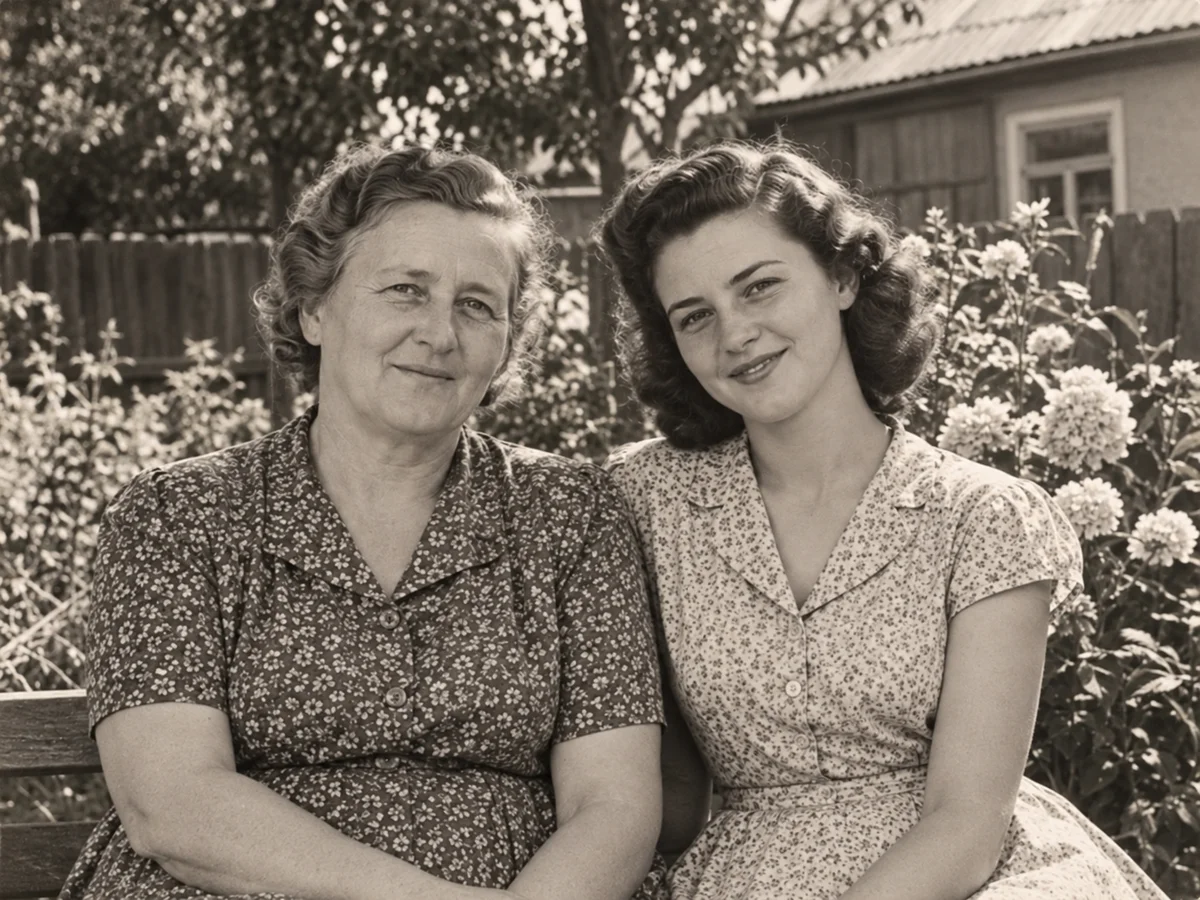
The result reduces visible vertical scratches, edge damage, and faded contrast while keeping the two subjects recognizable in this run. That consistency is useful evidence for this sample, but it cannot establish that AI recovered historically correct detail. A real family photograph should still be checked by someone who recognizes the people.
Common old photo restoration mistakes
Most avoidable failures happen before the final download. These four checks prevent a polished result from replacing useful evidence in the source.
Starting with a screenshot or compressed chat copy
Compression removes the small tonal changes that help distinguish wrinkles, hair, fabric, and scratches. Return to the original scan or highest-resolution file before trying stronger restoration settings.
Choosing the smoothest face
Plastic-looking skin and perfectly sharp eyes may signal that the model has replaced uncertainty with a familiar facial pattern. Prefer the version that agrees with the source, even when it retains some grain.
Repairing, colorizing, and enlarging in one decision
Each transformation makes comparison harder. Repair damage first, review identity, then create separate colorized or enlarged copies only when you need them.
Overwriting the original scan
A restoration is an interpretation of the source. Keep the untouched master so future tools, a human restorer, or family members can review what was actually present.
When AI should be a draft rather than the final record
Use extra caution when:
- a face is largely missing, covered, or motion-blurred;
- the photograph is the only known image of a person;
- handwriting, uniforms, insignia, or objects have historical importance;
- the result will be used as legal, archival, journalistic, or genealogical evidence;
- repeated outputs produce different identities or expressions.
AI can still help explore a possible repair in these cases, but the untouched scan remains the record. A skilled human restorer can work locally, preserve uncertainty, and avoid rebuilding parts that the source cannot support.
| Condition | Reasonable AI role | Acceptance check |
|---|---|---|
| Fading, dust, or small scratches away from a face | First restoration pass | Compare tone, edges, clothing, and background objects |
| Scratch, blur, or missing detail across a face | Draft for careful review | Check identity at 100% and ask someone who recognizes the person |
| Large missing area or historically important evidence | Exploration only | Keep the scan as the record and consider manual restoration |
Restore the damage, then verify the person
The safest way to restore old photos is to separate preservation from enhancement. Protect the physical original, save an untouched digital master, process a duplicate, and inspect identity-bearing details before accepting the result.
Ready to review one photograph?
Run one copy through Enpix, compare the source and result closely, and download only the version you want to keep.
Try AI photo restorationFrequently asked questions
Can AI restore a badly damaged face?
It can create a visually complete face, but severe damage leaves less original evidence. The result may be plausible without being faithful. Treat it as a draft and consider manual restoration when identity matters.
Should I scan an old photo before restoring it?
A flat, evenly lit scan is usually the clearest starting point when the print is safe to scan. A careful phone photograph can also work. Keep the original and an untouched digital master either way.
Should I colorize and restore an old photo at the same time?
Separating the decisions makes review easier. Restore damage while preserving the original black-and-white or sepia tone first, then create a separate colorized version if wanted.
How can I tell whether AI changed someone's identity?
Compare the result and source at 100% view. Check the eyes, eyebrows, mouth, expression, face shape, hairline, age markers, glasses, jewelry, scars, and facial hair. Ask someone familiar with the person to review important photographs.
Sources and methodology
- U.S. National Archives: Digitizing Family Papers and Photographs
- Microsoft Research: Bringing Old Photos Back to Life
- GFPGAN official project and model notes
- GFPGAN paper: Towards Real-World Blind Face Restoration with Generative Facial Prior
The research projects explain general restoration challenges; they do not describe the models currently used by Enpix. Product behavior and the example result were checked against the Enpix implementation on September 22, 2026.